Sometimes we are in a hurry. Then we have to turn off our PC directly. But this causes a great harm of our PC. So, I am now informing you about a new trick by which you will be able to turn off your PC within a second. This will not do any harm to your PC. Please follow my following steps to do that and notice what is happening.
* Press Ctrl+Alt+Delete. Task manager will appear.
* Then click on Shut Down.
* Then press and hold Ctrl key in your keyboard and in the meantime click on Turn off.
* Now your PC will shut down within a few seconds.
December 19, 2009
December 3, 2009
How to Installing and Accessing the Windows XP Professional Recovery Console
In this practice, you install and then start the Recovery Console, and you look at Help
to determine which commands are available in the Recovery Console. You also use the
Listsvc command to view the services, and then use the Disable command to disable
the Server service. Complete Exercises 1, 2, and 3.
Exercise 1: Installing the Windows XP Professional Recovery Console
In this exercise, you install the Recovery Console.
1. Log on as Administrator.
2. Insert the Windows XP Professional CD into the CD-ROM drive.
3. When the Windows XP Professional CD splash screen appears, close it.
4. From the Start menu, click Run.
5. In the Run dialog box, type :\i386\winnt32 /cmdcons (where
represents the letter assigned to your CD-ROM drive), and then click
OK.
Security Alert If you have installed Windows XP Service Pack 2 on your computer, you cannot
install the Recovery Console. Instead, you must run the Recovery Console from your
installation CD. If you have not yet installed Service Pack 2, you can first install the Recovery
Console and then install Service Pack 2.
6. In the Windows Setup message box that appears, click Yes to install the Windows
XP Professional Recovery Console. Windows Setup next attempts to contact
Microsoft and confirm that you have the latest version of Setup; it then installs the
Windows XP Recovery Console on your hard disk. Windows XP Professional then
displays a Windows XP Professional Setup message box indicating that the Windows
Recovery Console has been successfully installed.
7. Click OK to close the Microsoft Windows XP Professional Setup dialog box.
Exercise 2: Using the Recovery Console to Disable the Server Service
In this exercise, you start the Recovery Console and use the Help command to view the
available commands. You then use the Listsvc and Disable commands.
1. Restart your computer.
2. In the Please Select The Operating System To Start screen, select Windows Recovery
Console.
3. The Windows XP Recovery Console starts and prompts you to select which Windows
installation you want to log on to. If you had more than one Windows XP
Professional installation on this computer, all of them would be listed here. Type
1 and then press ENTER.
4. When prompted for the Administrator password, enter your password and press
ENTER.
5. At the prompt, type help and then press ENTER to see the list of available commands.
6. Scroll through the list of commands.
7. The Listsvc command allows you to view all the available services. Type listsvc
and press ENTER, and then scroll through the list of available services.
8. Press ESC to stop viewing services.
9. Type disable and press ENTER.
The Disable command allows you to disable a Windows system service or driver.
10. Type disable server and then press ENTER.
Recovery Console displays several lines of text describing how the Registry entry
for the Server service has been changed from Service_Demand_Start to
Service_Disabled. The Server service is now disabled.
11. Type exit and then press ENTER to restart your computer.
Exercise 3: Restarting the Server Service
In this exercise, you confirm that the Server service is disabled and then restart it.
1. Log on as Administrator.
2. Click Start, click All Programs, click Administrative Tools, and then click Computer
Management.
3. In the Computer Management window, expand Services And Applications.
4. Under Services And Applications, click Services.
5. Double-click Server.
6. In the Server Properties dialog box, change the Startup Type option to Automatic
and click OK.
7. Right-click Server and click Start.
8. Close the Computer Management window.
Install the Recovery Console
To install the Recovery Console, insert the Windows XP Professional CD-ROM into
your CD-ROM drive, and close the Windows XP Professional CD dialog box if it opens.
Open a Run dialog box or a Command Prompt window in Windows XP Professional,
and run the command drive:\i386\Winnt32.exe /cmdcons, where drive represents the
letter of the CD-ROM or network drive that holds the Windows XP installation files.
After installation, you can start the Recovery Console by choosing it from the list of
installed operating systems—you do not need to have the installation CD.
How Will Start the Windows XP Professional Recovery Console
You can also run the Recovery Console from the Windows XP Professional CD-ROM
without installing it. The Recovery Console provides a limited set of administrative
commands that you can use to repair your Windows XP Professional installation. You
can use the following steps to start the Recovery Console from the Windows XP Professional
CD-ROM:
1. Insert the Windows XP Professional CD-ROM into the CD-ROM drive and restart
the computer. If your computer or the workstation you want to repair does not
have a bootable CD-ROM drive, you need to insert your Windows XP Professional
Setup Boot disk into your floppy disk drive. Insert the additional Windows XP Professional
Setup disks when you are prompted to do so.
2. When Setup displays the Setup Notification message, read it, and then press Enter
to continue.
3. Setup displays the Welcome To Setup screen. In addition to the initial installation
of Windows XP Professional, you can use Windows Setup to repair or recover a
damaged Windows XP Professional installation. Press R to repair a Windows XP
Professional installation.
4. The Windows XP Recovery Console screen appears. Press C to start the Recovery
Console.
5. If you have more than one installation of Windows XP Professional on the computer,
you are prompted to select which installation you want to repair. Type 1
and then press ENTER.
6. Type the Administrator’s password, and then press ENTER.
7. Setup displays a command prompt. Type help and then press ENTER for a list of
the commands available.
8. When you have completed the repair process, type exit and then press ENTER.
The computer will restart.
Create a Local User Account by Using Computer Management
To create local user accounts by using the Computer Management snap-in complete
the following steps:
1. From the Start menu, click Control Panel.
2. In the Control Panel window, click Performance And Maintenance.
3. In the Performance And Maintenance window, click Administrative Tools.
4. In the Administrative Tools window, double-click Computer Management.
Tip You can also access the Computer Management window by right-clicking the My Computer
icon on the desktop or Start menu and clicking Manage.
5. In the console tree of the Computer Management window, click the Computer
Management plus sign (+) icon to expand the tree. Computer Management contains
three folders: System Tools, Storage, and Services And Applications.
6. In the console tree, expand System Tools, and then click Local Users And Groups.
7. In the details pane, right-click Users, and then click New User.
8. Fill in the appropriate text boxes in the New User dialog box,click Create, and then click Close.
How to Increasing Security by Using EFS
In this practice, you log on as an administrator and encrypt a folder and its files. You
then log on using a different user account, and attempt to open an encrypted file and
disable encryption on the encrypted file.
1. In Windows Explorer, create a folder named Secret on the C drive.
2. In the Secret folder, create a text file named SecretFile.txt.
3. Right-click the Secret folder, and then click Properties.
Windows XP Professional displays the Secret Properties dialog box with the General
tab active.
4. Click Advanced.
The Advanced Attributes dialog box appears.
5. Select the Encrypt Contents To Secure Data check box, and then click OK.
6. Click OK to close the Secret Properties dialog box.
The Confirm Attribute Change dialog box informs you that you are about to
encrypt a folder. You have two choices: You can encrypt only this folder, or you
can encrypt the folder and all subfolders and files in the folder
7. Select the Apply Changes To This Folder, Subfolders And Files option, and then
click OK.
8. Open the Secret folder.
9. What color is the SecretFile.txt text file? Why?
10. In the Secret folder, right-click the SecretFile.txt text file, and then click Properties.
The SecretFile.txt Properties dialog box appears.
11. Click Advanced.
The Advanced Attributes dialog box appears. Notice that the Encrypt Contents To
Secure Data check box is selected.
12. Close the Advanced Attributes dialog box.
13. Close the Properties dialog box.
14. Close all windows and log off.
15. Log on as User5.
16. In Windows Explorer, locate and open the SecretFile.txt text file.
17. What happens?
18. Close Notepad.
19. Right-click the SecretFile.txt text file, and then click Properties.
20. Click Advanced.
21. Clear the Encrypt Contents To Secure Data check box, and then click OK.
22. Click OK to close the SecretFile.txt Properties dialog box.
The Error Applying Attributes dialog box appears and informs you that access to
the file is denied.
23. Click Cancel.
24. Close all open windows and dialog boxes.
25. Log off.
How to Defragment a Hard Drive
1. Click Start, point to All Programs, point to Accessories, point to System Tools, and
then click Disk Defragmenter.
Windows XP Professional displays the Disk Defragmenter dialog box.
2. If there are multiple volumes on your computer, select C, and then click Analyze.
3. If Windows XP Professional displays a dialog box, indicating that there is no need
to defragment your volume at this time, click Close, and then read through Steps
6 through 12.
4. If Windows XP Professional displays a Disk Defragmenter dialog box, indicating
that you need to defragment your volume now, click View Report.
5. In the Analysis Report dialog box, scroll through the Volume Information box.
6. Scroll through the Most Fragmented Files box, and then click Save As.
Windows XP Professional displays the Save Defragmentation Report dialog box.
Notice that the default title for the report is VolumeC, and the default location for
the report is in the My Documents folder.
7. Click Save to save the report as VolumeC in the My Documents folder.
You are returned to the Analysis Report dialog box.
8. Click Defragment.
Disk Defragmenter defragments the volume. This process could take a long
time to complete, depending on the size of the volume and the amount of fragmentation.
9. Compare the Analysis Display with the Defragmentation Display.
10. Close Disk Defragmenter.
Leave the Local Disk (C:) Properties dialog box open for the next exercise.
How to Run Disk Cleanup
1. In the General tab of the Local Disk (C:) Properties dialog box, click Disk Cleanup.
A Disk Cleanup dialog box appears, indicating that it is calculating how much
space you can free on the C drive.
2. In the Files To Delete list box in the Disk Cleanup For (C:) dialog box, review the
files that Disk Cleanup is recommending you delete.
Security Alert If you started with a clean hard disk and installed Windows XP Professional
in Chapter 2, there might be few, if any, files that Disk Cleanup found to delete. If you
want to delete any files that Disk Cleanup recommends that you delete, make sure that the
files you want to delete are selected (a check mark is in the check box in front of the files),
and then click OK.
3. Click the More Options tab.
4. When would you use the options available in the More Options tab?
5. Click Cancel.
6. Close Disk Cleanup and all open windows.
How Do You Work With Domains
A domain is a logical grouping of network computers that share a central directory
database. A directory database contains user accounts and security
information for the domain. This database, which is known as the directory, is the database
portion of Active Directory service—the Windows 2003 directory service. In a domain, the directory resides on computers that are configured as domain controllers.
A domain controller is a server that manages all security-related aspects of user
and domain interactions, centralizing security and administration
A domain does not refer to a single location or specific type of network configuration.
The computers in a domain can share physical proximity on a small LAN or they can
be located in different corners of the world. They can communicate over any number
of physical connections, including dial-up connections, Integrated Services Digital Network
(ISDN) circuits, Ethernet networks, token ring connections, frame relay networks,
satellite links, and leased lines.
The benefits of a domain include the following:
1. Centralized administration because all user information is stored in the Active
Directory database. This centralization allows users to manage only a single user
name and password, and enables domain administrators to control which users
can access resources on any computer that is a member of the domain.
2. A single logon process for users to gain access to network resources (such as file,
print, and application resources) for which they have permissions. In other words,
you can log on to one computer and use resources on another computer in the
network as long as you have appropriate permissions to access the resource.
3. Scalability, so that you can create very large networks with hundreds or thousands
of computers.
A typical Windows 2003 domain includes the following types of computers:
Domain controllers running Windows Server 2003 Each domain controller
stores and maintains a copy of Active Directory. In a domain, you create a user
account in Active Directory only once. When a user logs on to a computer in the
domain, a domain controller authenticates the user by checking the directory for
the user name, password, and logon restrictions. When there are multiple domain
controllers in a domain, they periodically replicate their directory information so that each domain controller has a copy of Active Directory. Domain controllers do
not maintain a local user database.
Member servers running Windows Server 2003 A member server is a server
that is a member of a domain, but is not configured as a domain controller. A
member server does not store directory information and cannot authenticate users.
Member servers provide shared resources such as shared folders or printers.
Client computers running Windows XP Professional or Windows 2000
Professional Client computers run a user’s desktop environment and allow the
user to gain access to resources in the domain.
How to Work with Workgroups
A Windows XP Professional workgroup is a logical grouping of networked computers
that share resources, such as files and printers. A workgroup is also called a peer-topeer
network because all computers in the workgroup can share resources as equals
(peers) without requiring a dedicated server.
Each computer in the workgroup maintains a local security database, which is a list of user
accounts and resource security information for the computer on which it resides. Using a
local security database on each workstation decentralizes the administration of user
accounts and resource security in a workgroup.
Because workgroups have decentralized administration and security, the following are
true:
■ A user must have a user account on a local computer if that user wants to log on
to that computer locally (that is, by sitting down at that computer).
■ Any changes to user accounts, such as changing a user’s password or adding a
new user account, must be made on each computer in the workgroup. If you forget
to add a new user account to one of the computers in your workgroup, the
new user cannot log on to that computer and cannot access resources on it.
Workgroups provide the following advantages:
■ Workgroups do not require a domain controller to hold centralized security information,
making workgroups much simpler to configure and manage.
■ Workgroups are simple to design and implement. Workgroups do not require the
extensive planning and administration that a domain requires.
■ Workgroups provide a convenient networking environment for a limited number
of computers in close proximity. However, a workgroup becomes impractical in
environments with more than 10 computers.
Subtrees of Registry
Understanding the purpose of each subtree can help you locate specific keys and values
in the Registry. The following five subtrees or subtree keys are displayed in the Registry Editor.
HKEY_CLASSES_ROOT Contains software configuration data: object linking and embedding (OLE) and file-class association data. This subtree points to the Classes subkey under HKEY_LOCAL_MACHINE\SOFTWARE.
HKEY_CURRENT_USER Contains data about the current user. Retrieves a copy of each user account used to log on to the computer from the NTUSER.DAT file and stores it in the %systemroot%\Profiles\username key. This subkey points to the same data contained in HKEY_USERS\SID_currently_logged_on_user. This subtree
takes precedence over HKEY_LOCAL_MACHINE for duplicated values.
HKEY_LOCAL_MACHINE Contains all configuration data for the local computer, including hardware and operating system data such as bus type, system memory, device drivers, and startup control data. Applications, device drivers, and the operating system use this data to set the computer configuration. The data in this subtree
remains constant regardless of the user.
HKEY_USERS Contains the .DEFAULT subkey, which holds the system default settings (system default profile) used to display the CTRL+ALT+DELETE logon screen, and the Security Identifier (SID) of the current user.
HKEY_CURRENT_CONFIG Contains data on the active hardware profile extracted from the SOFTWARE and SYSTEM hives. This information is used to configure settings such as the device drivers to load and the display resolution to use.
The HKEY_LOCAL_MACHINE Subtree
HKEY_LOCAL_MACHINE provides a good example of the subtrees in the Registry for two reasons:
■ The structure of all subtrees is similar.
■ HKEY_LOCAL_MACHINE contains information specific to the local computer and is always the same, regardless of the user who is logged on. The HKEY_LOCAL_MACHINE root key has five subkeys.
Subkeys of HKEY_LOCAL_MACHINE
Understanding the purpose of each subtree can help you locate specific keys and values
in the Registry. The following five subtrees or subtree keys are displayed in the Registry Editor.
HKEY_CLASSES_ROOT Contains software configuration data: object linking and embedding (OLE) and file-class association data. This subtree points to the Classes subkey under HKEY_LOCAL_MACHINE\SOFTWARE.
HKEY_CURRENT_USER Contains data about the current user. Retrieves a copy of each user account used to log on to the computer from the NTUSER.DAT file and stores it in the %systemroot%\Profiles\username key. This subkey points to the same data contained in HKEY_USERS\SID_currently_logged_on_user. This subtree
takes precedence over HKEY_LOCAL_MACHINE for duplicated values.
HKEY_LOCAL_MACHINE Contains all configuration data for the local computer, including hardware and operating system data such as bus type, system memory, device drivers, and startup control data. Applications, device drivers, and the operating system use this data to set the computer configuration. The data in this subtree
remains constant regardless of the user.
HKEY_USERS Contains the .DEFAULT subkey, which holds the system default settings (system default profile) used to display the CTRL+ALT+DELETE logon screen, and the Security Identifier (SID) of the current user.
HKEY_CURRENT_CONFIG Contains data on the active hardware profile extracted from the SOFTWARE and SYSTEM hives. This information is used to configure settings such as the device drivers to load and the display resolution to use.
The HKEY_LOCAL_MACHINE Subtree
HKEY_LOCAL_MACHINE provides a good example of the subtrees in the Registry for two reasons:
■ The structure of all subtrees is similar.
■ HKEY_LOCAL_MACHINE contains information specific to the local computer and is always the same, regardless of the user who is logged on. The HKEY_LOCAL_MACHINE root key has five subkeys.
in the Registry. The following five subtrees or subtree keys are displayed in the Registry Editor.
HKEY_CLASSES_ROOT Contains software configuration data: object linking and embedding (OLE) and file-class association data. This subtree points to the Classes subkey under HKEY_LOCAL_MACHINE\SOFTWARE.
HKEY_CURRENT_USER Contains data about the current user. Retrieves a copy of each user account used to log on to the computer from the NTUSER.DAT file and stores it in the %systemroot%\Profiles\username key. This subkey points to the same data contained in HKEY_USERS\SID_currently_logged_on_user. This subtree
takes precedence over HKEY_LOCAL_MACHINE for duplicated values.
HKEY_LOCAL_MACHINE Contains all configuration data for the local computer, including hardware and operating system data such as bus type, system memory, device drivers, and startup control data. Applications, device drivers, and the operating system use this data to set the computer configuration. The data in this subtree
remains constant regardless of the user.
HKEY_USERS Contains the .DEFAULT subkey, which holds the system default settings (system default profile) used to display the CTRL+ALT+DELETE logon screen, and the Security Identifier (SID) of the current user.
HKEY_CURRENT_CONFIG Contains data on the active hardware profile extracted from the SOFTWARE and SYSTEM hives. This information is used to configure settings such as the device drivers to load and the display resolution to use.
The HKEY_LOCAL_MACHINE Subtree
HKEY_LOCAL_MACHINE provides a good example of the subtrees in the Registry for two reasons:
■ The structure of all subtrees is similar.
■ HKEY_LOCAL_MACHINE contains information specific to the local computer and is always the same, regardless of the user who is logged on. The HKEY_LOCAL_MACHINE root key has five subkeys.
How to Edit the Registry Using the Registry Editor
Setup installs Registry Editor (REGEDIT.EXE) in the %systemroot%\System32 directory during installation. However, because most users do not need to use Registry Editor, it does not appear on the Start menu. To start Registry Editor, click Run on the Start menu, type Regedit, and then click OK. Although Registry Editor allows you to perform manual edits on the Registry, it is intended for troubleshooting and problem resolution. You should make most configuration changes through either Control Panel or Administrative Tools. However, some
configuration settings can be made only directly through the Registry.
Caution Using Registry Editor incorrectly can cause serious, system-wide problems that
could require reinstallation of Windows XP Professional. When using Registry Editor to view or
edit data, use a program such as Windows Backup to save a backup copy of the Registry file
before viewing. In Windows XP Professional, you can use Backup to back up the System State,
which includes the Registry, the COM class registration database, and the system boot files.
Registry Editor saves data automatically as you make entries or corrections. New Registry
data takes effect immediately. You can select Find Key on the View menu to search the Registry for a specific key.
Key names appear in the left pane of Registry Editor. The search begins at the currently selected key and parses all descendant keys for the specified key name. The search is local to the subtree in which the search begins. For example, a search for a key in the HKEY_LOCAL_MACHINE subtree does not include keys under HKEY_CURRENT_USER.
December 2, 2009
How did u Configure and Use Remote Assistance
A Remote Assistance session requires that both the user needing help and the expert
user actively participate in establishing the connection. The session is established in the
following phases:
1. The user that needs help sends a Remote Assistance invitation to the expert user.
2. The expert user responds to the invitation.
3. The user accepts the expert user’s assistance.
To send a Remote Assistance invitation, use these steps:
1. From the Start menu, select Help And Support.
2. In the Help And Support Center, under Ask For Assistance, select Invite A Friend
To Connect To Your Computer With Remote Assistance, and then select Invite Someone To Help You.
3. Select the method that you want to use to create the invitation, as shown in Figure
18-18. You can send invitations directly by using Windows Messenger, by using an e-mail attachment, or by saving an invitation file and transmitting it to the helper user (for example, you could save the file to a shared folder on the network).
4. When prompted, enter the requested information, including your name, a message, when the invitation should expire, and (optionally) a password to be used to establish the connection.
5. Click Send Invitation
Note When an invitation is sent through an e-mail attachment or saved as a file, the file has a .MsRcIndicent extension. An expert user must respond to an invitation to continue the process. If the invitation is by using Windows Messenger, you must accept the invitation that is presented in the Messenger pop-up window. If the invitation is sent by e-mail, you must open the attached invitation. If the invitation file is transmitted in some other fashion, you must access and open it. If a password is required, you must enter the password in the
Remote Assistance dialog box. Tip Using Windows Messenger to establish a Remote Assistance connection is the easiest method because the Windows Messenger connection can usually be established regardless of whether there are firewalls on either the user’s or the expert helper’s network. If you use another method of establishing a Remote Assistance session, you must configure a firewall to allow the connection. Like Remote Desktop, Remote Assistance uses TCP port 3389 by default. Windows then notifies the user requiring assistance that the request has been accepted. The user must click Yes in the Remote Assistance dialog box as a final indication of acceptance, and Remote Assistance then establishes the connection.
Create a Microsoft Management Console(MMC)
1. First click Start, and then click Run.
2. In the Open text box, type mmc, and then click OK.
3. Maximize the Console1 and Console Root windows.
4. From the File menu, choose Options to view the configured console mode. In what mode is the console running?
5. Verify that the Console Mode drop-down list box is in Author mode, and then click OK.
6. From the File menu, click Add/Remove Snap-In.
The Add/Remove Snap-In dialog appears with the Standalone tab active. Notice that there are no snap-ins loaded.
7. In the Add/Remove Snap-In dialog box, click Add to display the Add Standalone Snap-In dialog box.
8. Locate the Event Viewer snap-in, and then click Add.
The Select Computer dialog box appears, allowing you to specify the computer you want to administer. You can add the Event Viewer snap-in for the local computer on which you are working, or if your local computer is part of a network, you can add Event Viewer for a remote computer.
9. In the Select Computer dialog box, select Local Computer, and then click Finish.
10. In the Add Standalone Snap-In dialog box, click Close, and then in the Add/ Remove Snap-Ins dialog box, click OK.
Event Viewer (Local) now appears in the console tree. You may adjust the width of the console tree pane and expand any nodes that you want to view.
11. On your own, add a snap-in for Device Manager (local).
12. Save the MMC as MyEvents.
November 24, 2009
Windows XP Keyboard Shortcut
General:
Help - F1
Copy - CTRL+C
Cut - CTRL+X
Paste - CTRL+V
Undo action - CTRL+Z
Redo action - CTRL+Y
Delete selected item (item will be moved to the Recycle Bin) - DELETE
Delete selected item (item will NOT be moved to the Recycle Bin) - SHIFT+DELETE
Copy selected item – CTRL while dragging selected item
Create shortcut – CTRL+SHIFT while dragging an item
Rename selected item - F2
Move mouse cursor to the beginning of the next word - CTRL+RIGHT ARROW
Move mouse cursor to the beginning of the previous word - CTRL+LEFT ARROW
Move mouse cursor to the beginning of the next paragraph - CTRL+DOWN ARROW
Move cursor to the beginning of the previous paragraph - CTRL+UP ARROW
Select text block - CTRL+SHIFT with an arrow key
Select more than one item - SHIFT with any arrow key
Select all items - CTRL+A
Search – F3
Display selected item’s properties - ALT+ENTER
Close – ALT+F4
Shortcut menu for the active window - ALT+SPACEBAR
Close active doc - CTRL+F4
Switch between open items - ALT+TAB
Cycle through items in the order in which they were opened - ALT+ESC
Cycle through screen elements - F6
Address bar in Windows Explorer – F4
Shortcut menu for selected item - SHIFT+F10
Start menu - CTRL+ESC or Win (the key with the windows logo on it from your keyboard).
Display System menu for active window - ALT+SPACEBAR
Display corresponding menu - ALT+underlined letter
Perform the menu command or other underlined command - ALT+underlined letter
Menu bar in the active program - F10
Open next menu to the right, or open a submenu - RIGHT ARROW
Close next menu to the left, or close a submenu - LEFT ARROW
Refresh active window - F5
One level up in Windows Explorer - BACKSPACE
Cancel current task - ESC
Task Manager - CTRL+SHIFT+ESC ort ALT+CTRL+DEL
CD/DVD does not automatically play - hold Shift while inserting the disk.
Windows Explorer:
Bottom of active window - END
Top of active window - HOME
Display all subfolders under the selected folder - NUM LOCK+ASTERISK (*) on numeric keypad
Display contents of selected folder - NUM LOCK+PLUS SIGN (+) on numeric keypad
Collapse selected folder - NUM LOCK+MINUS SIGN (-) on numeric keypad
Collapse current selection if expanded, or select parent folder - LEFT ARROW
Display current selection if collapsed, or select first subfolder - RIGHT ARROW
Address bar - ALT+D
One level up - BACKSPACE
Dialog Box:
Enable extended mode – SHIFT+F8 in extended selection list boxes. Use arrow keys to move the cursor without changing the selection. Adjust the selection by pressing CTRL+SPACEBAR or SHIFT+SPACEBAR. Press SHIFT+F8 to cancel extended selection mode.
Move forward through tabs - CTRL+TAB
Move backward through tabs - CTRL+SHIFT+TAB
Move forward through options - TAB
Move back through options - SHIFT+TAB
Perform command or select option that goes with that letter - ALT+underlined letter
Access command - ENTER
Select or clear check box - SPACEBAR
Select a button - Arrow keys
Help - F1
Display items in the active list - F4
Open a folder one level up – BACKSPACE
Accessibility:
Filter Keys on/off - Right SHIFT for eight seconds
High Contrast on/off - Left ALT+left SHIFT+PRINT SCREEN
Mouse Keys on/off - Left ALT+left SHIFT+NUM LOCK
Sticky Keys on/off - SHIFT five times
Toggle Keys on/off - NUM LOCK for five seconds
Utility Center - Win +U
Win+X (Microsoft natural keyboard shortcuts):-
Start menu – Win
System Properties – Win+PAUSE/BREAK
Desktop - Win+D
Minimize all windows - Win+M
Restore minimized windows to the desktop - Win+SHIFT+M
Open Computer - Win+E
Search for a file or folder - Win+F
Search for computers on the network - CTRL+Win+F
Windows Help- Win+F1
Lock keyboard - Win+L
Run dialog box - Win+R
Open Run dialog box - Win+U
Help - F1
Copy - CTRL+C
Cut - CTRL+X
Paste - CTRL+V
Undo action - CTRL+Z
Redo action - CTRL+Y
Delete selected item (item will be moved to the Recycle Bin) - DELETE
Delete selected item (item will NOT be moved to the Recycle Bin) - SHIFT+DELETE
Copy selected item – CTRL while dragging selected item
Create shortcut – CTRL+SHIFT while dragging an item
Rename selected item - F2
Move mouse cursor to the beginning of the next word - CTRL+RIGHT ARROW
Move mouse cursor to the beginning of the previous word - CTRL+LEFT ARROW
Move mouse cursor to the beginning of the next paragraph - CTRL+DOWN ARROW
Move cursor to the beginning of the previous paragraph - CTRL+UP ARROW
Select text block - CTRL+SHIFT with an arrow key
Select more than one item - SHIFT with any arrow key
Select all items - CTRL+A
Search – F3
Display selected item’s properties - ALT+ENTER
Close – ALT+F4
Shortcut menu for the active window - ALT+SPACEBAR
Close active doc - CTRL+F4
Switch between open items - ALT+TAB
Cycle through items in the order in which they were opened - ALT+ESC
Cycle through screen elements - F6
Address bar in Windows Explorer – F4
Shortcut menu for selected item - SHIFT+F10
Start menu - CTRL+ESC or Win (the key with the windows logo on it from your keyboard).
Display System menu for active window - ALT+SPACEBAR
Display corresponding menu - ALT+underlined letter
Perform the menu command or other underlined command - ALT+underlined letter
Menu bar in the active program - F10
Open next menu to the right, or open a submenu - RIGHT ARROW
Close next menu to the left, or close a submenu - LEFT ARROW
Refresh active window - F5
One level up in Windows Explorer - BACKSPACE
Cancel current task - ESC
Task Manager - CTRL+SHIFT+ESC ort ALT+CTRL+DEL
CD/DVD does not automatically play - hold Shift while inserting the disk.
Windows Explorer:
Bottom of active window - END
Top of active window - HOME
Display all subfolders under the selected folder - NUM LOCK+ASTERISK (*) on numeric keypad
Display contents of selected folder - NUM LOCK+PLUS SIGN (+) on numeric keypad
Collapse selected folder - NUM LOCK+MINUS SIGN (-) on numeric keypad
Collapse current selection if expanded, or select parent folder - LEFT ARROW
Display current selection if collapsed, or select first subfolder - RIGHT ARROW
Address bar - ALT+D
One level up - BACKSPACE
Dialog Box:
Enable extended mode – SHIFT+F8 in extended selection list boxes. Use arrow keys to move the cursor without changing the selection. Adjust the selection by pressing CTRL+SPACEBAR or SHIFT+SPACEBAR. Press SHIFT+F8 to cancel extended selection mode.
Move forward through tabs - CTRL+TAB
Move backward through tabs - CTRL+SHIFT+TAB
Move forward through options - TAB
Move back through options - SHIFT+TAB
Perform command or select option that goes with that letter - ALT+underlined letter
Access command - ENTER
Select or clear check box - SPACEBAR
Select a button - Arrow keys
Help - F1
Display items in the active list - F4
Open a folder one level up – BACKSPACE
Accessibility:
Filter Keys on/off - Right SHIFT for eight seconds
High Contrast on/off - Left ALT+left SHIFT+PRINT SCREEN
Mouse Keys on/off - Left ALT+left SHIFT+NUM LOCK
Sticky Keys on/off - SHIFT five times
Toggle Keys on/off - NUM LOCK for five seconds
Utility Center - Win +U
Win+X (Microsoft natural keyboard shortcuts):-
Start menu – Win
System Properties – Win+PAUSE/BREAK
Desktop - Win+D
Minimize all windows - Win+M
Restore minimized windows to the desktop - Win+SHIFT+M
Open Computer - Win+E
Search for a file or folder - Win+F
Search for computers on the network - CTRL+Win+F
Windows Help- Win+F1
Lock keyboard - Win+L
Run dialog box - Win+R
Open Run dialog box - Win+U
How to enable task manager
There are three methods to enable the task manager that you can follow:
1.Click Start, Run and type this command exactly as given below:
Better copy and paste it to be exact.
REG add HKCU\Software\Microsoft\Windows\CurrentVersion\Policies\System /v DisableTaskMgr /t REG_DWORD /d 0 /f
2.
1.Click Start, Run and type this command exactly as given below:
Better copy and paste it to be exact.
REG add HKCU\Software\Microsoft\Windows\CurrentVersion\Policies\System /v DisableTaskMgr /t REG_DWORD /d 0 /f
2.
* Click Start, Run and type Regedit.exe
* Navigate to the following branch:
HKEY_CURRENT_USER \ Software \ Microsoft \ Windows \ CurrentVersion \ Policies\ System
* In the right-pane, delete the value named DisableTaskMgr
* Close Regedit.exe
3.
* Click Start, Run, type gpedit.msc and click OK.
* Navigate to this branch:
User Configuration / Administrative Templates / System / Ctrl+Alt+Delete Options / Remove Task Manager
* Double-click the Remove Task Manager option.
* Set the policy to Not Configured.
November 13, 2009
Login to Yahoo Messenger with multiple id in same time
I have good news for those who like chatting by using Yahoo! Messenger. We usually have more than one account (including Kang Rohman). In default, if we log in to Yahoo! Messenger on our computer, we cannot log in again with another account. If we try to log in with another account, automatically, the previously logged-in-account will be logged out, in other words, we can only log in with one account.
Is there a way to be able to log in with multi account within the same time? Well, actually there is the way to log in with multiple accounts in the same time. Want to know? Below are the steps (for Windows XP)
1. Click Start on your computer
2. Click Run…
3. Write : regedit
4. Click OK
5. When window registry editor open, find HKEY_CURRENT_USER
6. Open this: HKEY_CURRENT_USER ⇒ Software ⇒ Yahoo ⇒ Pager ⇒ Test.
7. Right click at the folder Test ⇒ New ⇒ DWORD Value
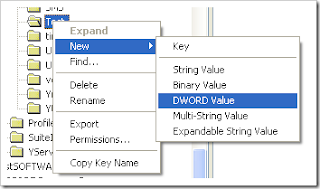 8. Rename the New Value #1 becomes : Plural
9. Right click at Plural ⇒ Modify
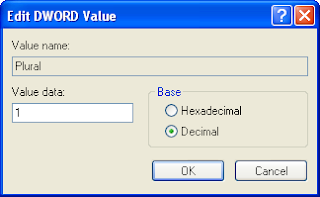
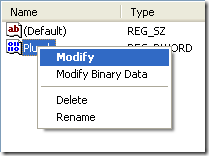 10.Change Value Data becomes 1, Base choose at decimal. Click OK
11.Close your Window Registry editor
Thats ok.You have done.
Is there a way to be able to log in with multi account within the same time? Well, actually there is the way to log in with multiple accounts in the same time. Want to know? Below are the steps (for Windows XP)
1. Click Start on your computer
2. Click Run…
3. Write : regedit
4. Click OK
5. When window registry editor open, find HKEY_CURRENT_USER
6. Open this: HKEY_CURRENT_USER ⇒ Software ⇒ Yahoo ⇒ Pager ⇒ Test.
7. Right click at the folder Test ⇒ New ⇒ DWORD Value
 8. Rename the New Value #1 becomes : Plural
9. Right click at Plural ⇒ Modify
 10.Change Value Data becomes 1, Base choose at decimal. Click OK
11.Close your Window Registry editor
Thats ok.You have done.
November 10, 2009
Disable Error Reporting From Your PC
 Whenever an application suffers from an error, and is closed down by the system or by you, the Microsoft Error Reporting feature will pop up, asking you if you want to send a report about the problem to Microsoft.
As I have reported previously, there are some privacy concerns with this.
Windows allows you to customize the way Error Reporting works. Open the System applet from Control Panel, and select the Advanced tab. Near the bottom, click the Error Reporting button.
You can enable or disable Error Reporting, or when you leave it enabled, you can specify which programs you want to exclude from this feature.
Customize Error Reporting

As I have reported previously, there are some privacy concerns with this.
Windows allows you to customize the way Error Reporting works. Open the System applet from Control Panel, and select the Advanced tab. Near the bottom, click the Error Reporting button.
You can enable or disable Error Reporting, or when you leave it enabled, you can specify which programs you want to exclude from this feature.
Display Administrator Account on Welcome Screen at Start Time
By default, the Administrator account is not displayed on the Welcome Screen. To log in to the Administrator account, press Ctrl+Alt+Del, release the Del key, and press it again, while still holding down the Ctrl+Alt keys. This will change the Welcome Screen login to the Windows 2000 style log in, where you can now type Administrator and the password for the Admin account.
You could also add the Administrator to the Welcome Screen:
1. Start the Registry Editor
2. Go to HKEY_LOCAL_MACHINE \ SOFTWARE \ Microsoft \ Windows NT \ CurrentVersion \ Winlogon \ SpecialAccounts \ UserList \
3. Right-click an empty space in the right pane and select New > DWORD Value
4. Name the new value Administrator
5. Double-click this new value, and enter 1 as it's Value data
6. Close the registry editor .
Hide Users on the Welcome Screen From Your PC
When you add an account for certain users with Windows XP, their user names will appear on the Welcome Screen. Sometimes a user needs to be added to a Windows XP machine, because the user needs access (via the network) to resources on the machine, but the user will not be physically logging in on the computer. You can remove this user name from the Welcome Screen, while still maintaining the user account.
1. Start the Registry Editor
2. Go to HKEY_LOCAL_MACHINE \ SOFTWARE \ Microsoft \ Windows NT \ CurrentVersion \ Winlogon \ SpecialAccounts \ UserList \
3. Right-click an empty space in the right pane and select New > DWORD Value
4. Name the new value exactly as the Username
5. Leave the Value data as 0
6. If you want to enable this user again on the Welcome Screen, either double-click the Username value, and change the Value data to 1, or delete the Username
7. Close the registry editor
Use the Hibernate Option
The hibernate feature saves everything in memory on your hard disk, turns off your monitor and hard disk, and then turns off your computer. When you restart your computer, your desktop is restored exactly as you left it.
Typically, you put your computer in hibernation when you will be away from the computer for an extended time or overnight. When you restart the computer, your desktop is restored exactly as you left it.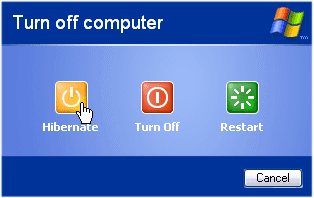
To put your system in hibernate, press Turn Off Computer on the Start menu, and on the next window, put your cursor over the Stand By button. Now press the Shift key on your keyboard. Stand By will change to Hibernate.
To use Windows Power Options, you must have a computer that is set up by the manufacturer to support these features. For more information, see the documentation that came with your computer.
What you need to know is that if hibernate is enabled on your computer, a hidden file hiberfill.sys is created in the root of your system drive (usually C:\), which is around the same size as your system's memory (RAM). You can't move this file to another drive, it has to be in the root of your system drive. If you don't use hibernate, you can remove this file by going to the Power Options in Control Panel, and on the Hibernate tab un-check Enable hibernation
Typically, you put your computer in hibernation when you will be away from the computer for an extended time or overnight. When you restart the computer, your desktop is restored exactly as you left it.

To put your system in hibernate, press Turn Off Computer on the Start menu, and on the next window, put your cursor over the Stand By button. Now press the Shift key on your keyboard. Stand By will change to Hibernate.
To use Windows Power Options, you must have a computer that is set up by the manufacturer to support these features. For more information, see the documentation that came with your computer.
What you need to know is that if hibernate is enabled on your computer, a hidden file hiberfill.sys is created in the root of your system drive (usually C:\), which is around the same size as your system's memory (RAM). You can't move this file to another drive, it has to be in the root of your system drive. If you don't use hibernate, you can remove this file by going to the Power Options in Control Panel, and on the Hibernate tab un-check Enable hibernation
Create a Password Recovery Disk in Your PC
If you want some added safety in case you forget your password, you should create a Password Recovery Disk. To do so, open User Accounts from the Control Panel. Select the account for which you want to create a Password Recovery Disk; this will put you in the change 'mode'. From the Related Tasks at the left side, choose Prevent a forgotten password and follow the wizard to create a Password Recovery Disk.
If you upgraded from Windows NT or 2000, you will need to create new disks. The old disks you created on the previous OS version won't work.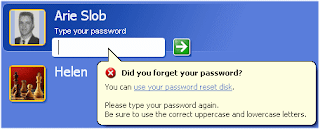
When you ever forget your password, you can press the and you will see a link to use your Password Recovery Disk. This will verify your access rights, and prompt you to create a new password, which you can use to access your account. The new password is written to your recovery disk at the same time you create it.
If you upgraded from Windows NT or 2000, you will need to create new disks. The old disks you created on the previous OS version won't work.

When you ever forget your password, you can press the and you will see a link to use your Password Recovery Disk. This will verify your access rights, and prompt you to create a new password, which you can use to access your account. The new password is written to your recovery disk at the same time you create it.
Remove Shared Documents Folder from Your Computer
If your computer is part of a Workgroup, you will notice that a Shared Documents folder appears in My Computer. This folder lets you share files with multiple users easily. If you want to remove this folder you can:
1. Start the Registry Editor
2. Go to HKEY_CURRENT_USER \ Software \ Microsoft \ Windows \ CurrentVersion \ Policies \ Explorer \
3. Right-click an empty space in the right pane and select New > DWORD Value
4. Name the new value NoSharedDocuments
5. Double-click this new value, and enter 1 as its Value data
6. Close the registry editor
7. Log off, or restart Windows for the changes to take effect
To reverse this process, change the Value data to 0, or delete the NoSharedDocuments Value.
Adjust the Size Of Thumbnails to your PC
There's an easy way to change the size of the thumbnails that are used in Windows Explorer's thumbnail view:
1. Start the Registry Editor
2. Go to HKEY_CURRENT_USER \ Software \ Microsoft \ Windows \ CurrentVersion \ Explorer \
3. Right-click an empty space in the right pane and select New > DWORD
4. Name the new value ThumbnailSize
5. Double-click this new value, and enter a value between 32 and 96 (hexadecimal)*
6. Close the registry editor
*) There have been information that the value can go up to 256 (hexadecimal), but I have not been able to set this value over 96 on my system. Frankly I doubt if higher values are indeed possible: 96 hex is already 150 (pixels) decimal. A thumbnail of 256 hex would be 598 pixels wide!
To return to the default, just delete the ThumbnailSize value.
The registry hack above will change the settings for the current user only. To change them for all users, add the key to HKEY_LOCAL_MACHINE \ Software \ Microsoft \ Windows \ CurrentVersion \ Explorer \ (you'll need administrative privileges to do this).
Prevent Your PC to Writing to USB Storage Devices
Many system administrators have had some sleepless nights over this: it is too easy for users to connect a device (USB-key or MP3 player) to the USB port of a computer, and copy things off the system. This is an obvious security risk. This has been addressed in Service Pack 2 for Windows XP. You have to manually add the following registry key:
1. Start the Registry Editor
2. Go to the HKEY_LOCAL_MACHINE \ SYSTEM \ CurrentControlSet \ Control key
3. If there is no key called StorageDevicePolicies, create it. You do this by right-clicking the HKEY_LOCAL_MACHINE \ SYSTEM \ CurrentControlSet \ Control key, and selecting New > Key from the menu.
4. Select the StorageDevicePolicies key
5. From the menu select Edit > New > DWORD Value
6. Name the new value WriteProtect
7. Right-click the WriteProtect value and choose Modify
8. In the Value Data: box enter 1
9. Exit the registry editor, and restart your computer
To reverse, just delete the new WriteProtect value (or set the value to 0) and restart the computer.
Note: works on Windows XP Service Pack 2 only!
Prevent Your Windows Media Player from Keeping a Recent-files List
 Windows Media Player's (WMP) file menu shows a list with the most recetly played files. To prevent WMP 8.0 (and later) from maintaining this list:
1. Start the Registry Editor
2. Select the HKEY_CURRENT_USER \ Software \ Microsoft \ MediaPlayer \ Preferences key
3. From the menu select Edit > New > Binary Value
4. Name the new value AddToMRU
5. Right-click the AddToMRU value and choose Modify
6. In the Value Data: box enter 00
7. Exit the registry editor
To reverse, just delete the new AddToMRU value (or set the value to 01).
Note: To clear current entries from the most recently played files list, delete the registry subkey HKEY_CURRENT_USER \ Software \ Microsoft \ MediaPlayer \ Player \ RecentFileList (see picture below)
To clear streamed media entries, delete the registry subkey HKEY_CURRENT_USER \ Software \ Microsoft \ MediaPlayer \ Player \ RecentURLList
Try To Keep RAS Connections Alive When Switching Users
You might have noticed that when you use the "Switch User" feature of Windows XP, you will lose your RAS (Dial-up and/or certain xDSL connections) connection. You can avoid this by entering the following to your registry:
1. Start the Registry Editor
2. Go to HKEY_LOCAL_MACHINE \ SOFTWARE \ Microsoft \ Windows NT \ CurrentVersion \ Winlogon
3. Right-click an empty space in the right-hand pane, and from the menu select New > String value
4. Name the new value KeepRASConnections
5. Right-click the KeepRASConnections value, and choose Modify from the menu
6. Enter 1 as the Value data
7. Close the registry editor and log off from Windows for the changes to take effect
Next time you switch user (Start > Log Off > Switch User), you won't lose your connection!
Add "Copy to Folder" and "Move to Folder" to Explorer Context Menu For Better Use
 You can add "Copy to Folder" and "Move to Folder" to the Explorer context menu, so when you right-click a file or folder in Explorer, you have the option to Copy or Move it to another folder.
 - Start the Registry Editor
- Go to HKEY_CLASSES_ROOT \ AllFilesystemObjects \ shellex \ ContextMenuHandlers \
- Right-click the ContextMenuHandlers entry, and from the menu select New > Key
- Name the new key Copy To
- Repeat step 3, but this time for the name (step 4) choose Move To
- Change the (Default) string value found in the Copy To key to {C2FBB630-2971-11D1-A18C-00C04FD75D13}
- Change the (Default) string value found in the Move To key to {C2FBB631-2971-11D1-A18C-00C04FD75D13}
- Close the registry editor
About Us
There are lots of PC problem we face daily when we open and use our PC.This difficult for a new user to handle it.So he need to face a expert.By this blog site we will are looking for the those PC problem that we are facing and trying to give a solution.
Being responsive to your needs is our number one priority. We are constantly looking for ways to improve our equipment and services, to maximize our efficiency, offer you more and better marketing tools, and make each project easier for you to manage.
Being responsive to your needs is our number one priority. We are constantly looking for ways to improve our equipment and services, to maximize our efficiency, offer you more and better marketing tools, and make each project easier for you to manage.
Contact
H.A.BOKTEARE HOSSEN
Chandgaon R/A House# 235, Road# 9, Block-B,
Chittagong, Bangladesh.
Mobile: +88-01815-720377.
Email: bokteare@gmail.com
Chandgaon R/A House# 235, Road# 9, Block-B,
Chittagong, Bangladesh.
Mobile: +88-01815-720377.
Email: bokteare@gmail.com

