General:
Help - F1
Copy - CTRL+C
Cut - CTRL+X
Paste - CTRL+V
Undo action - CTRL+Z
Redo action - CTRL+Y
Delete selected item (item will be moved to the Recycle Bin) - DELETE
Delete selected item (item will NOT be moved to the Recycle Bin) - SHIFT+DELETE
Copy selected item – CTRL while dragging selected item
Create shortcut – CTRL+SHIFT while dragging an item
Rename selected item - F2
Move mouse cursor to the beginning of the next word - CTRL+RIGHT ARROW
Move mouse cursor to the beginning of the previous word - CTRL+LEFT ARROW
Move mouse cursor to the beginning of the next paragraph - CTRL+DOWN ARROW
Move cursor to the beginning of the previous paragraph - CTRL+UP ARROW
Select text block - CTRL+SHIFT with an arrow key
Select more than one item - SHIFT with any arrow key
Select all items - CTRL+A
Search – F3
Display selected item’s properties - ALT+ENTER
Close – ALT+F4
Shortcut menu for the active window - ALT+SPACEBAR
Close active doc - CTRL+F4
Switch between open items - ALT+TAB
Cycle through items in the order in which they were opened - ALT+ESC
Cycle through screen elements - F6
Address bar in Windows Explorer – F4
Shortcut menu for selected item - SHIFT+F10
Start menu - CTRL+ESC or Win (the key with the windows logo on it from your keyboard).
Display System menu for active window - ALT+SPACEBAR
Display corresponding menu - ALT+underlined letter
Perform the menu command or other underlined command - ALT+underlined letter
Menu bar in the active program - F10
Open next menu to the right, or open a submenu - RIGHT ARROW
Close next menu to the left, or close a submenu - LEFT ARROW
Refresh active window - F5
One level up in Windows Explorer - BACKSPACE
Cancel current task - ESC
Task Manager - CTRL+SHIFT+ESC ort ALT+CTRL+DEL
CD/DVD does not automatically play - hold Shift while inserting the disk.
Windows Explorer:
Bottom of active window - END
Top of active window - HOME
Display all subfolders under the selected folder - NUM LOCK+ASTERISK (*) on numeric keypad
Display contents of selected folder - NUM LOCK+PLUS SIGN (+) on numeric keypad
Collapse selected folder - NUM LOCK+MINUS SIGN (-) on numeric keypad
Collapse current selection if expanded, or select parent folder - LEFT ARROW
Display current selection if collapsed, or select first subfolder - RIGHT ARROW
Address bar - ALT+D
One level up - BACKSPACE
Dialog Box:
Enable extended mode – SHIFT+F8 in extended selection list boxes. Use arrow keys to move the cursor without changing the selection. Adjust the selection by pressing CTRL+SPACEBAR or SHIFT+SPACEBAR. Press SHIFT+F8 to cancel extended selection mode.
Move forward through tabs - CTRL+TAB
Move backward through tabs - CTRL+SHIFT+TAB
Move forward through options - TAB
Move back through options - SHIFT+TAB
Perform command or select option that goes with that letter - ALT+underlined letter
Access command - ENTER
Select or clear check box - SPACEBAR
Select a button - Arrow keys
Help - F1
Display items in the active list - F4
Open a folder one level up – BACKSPACE
Accessibility:
Filter Keys on/off - Right SHIFT for eight seconds
High Contrast on/off - Left ALT+left SHIFT+PRINT SCREEN
Mouse Keys on/off - Left ALT+left SHIFT+NUM LOCK
Sticky Keys on/off - SHIFT five times
Toggle Keys on/off - NUM LOCK for five seconds
Utility Center - Win +U
Win+X (Microsoft natural keyboard shortcuts):-
Start menu – Win
System Properties – Win+PAUSE/BREAK
Desktop - Win+D
Minimize all windows - Win+M
Restore minimized windows to the desktop - Win+SHIFT+M
Open Computer - Win+E
Search for a file or folder - Win+F
Search for computers on the network - CTRL+Win+F
Windows Help- Win+F1
Lock keyboard - Win+L
Run dialog box - Win+R
Open Run dialog box - Win+U
November 24, 2009
How to enable task manager
There are three methods to enable the task manager that you can follow:
1.Click Start, Run and type this command exactly as given below:
Better copy and paste it to be exact.
REG add HKCU\Software\Microsoft\Windows\CurrentVersion\Policies\System /v DisableTaskMgr /t REG_DWORD /d 0 /f
2.
1.Click Start, Run and type this command exactly as given below:
Better copy and paste it to be exact.
REG add HKCU\Software\Microsoft\Windows\CurrentVersion\Policies\System /v DisableTaskMgr /t REG_DWORD /d 0 /f
2.
* Click Start, Run and type Regedit.exe
* Navigate to the following branch:
HKEY_CURRENT_USER \ Software \ Microsoft \ Windows \ CurrentVersion \ Policies\ System
* In the right-pane, delete the value named DisableTaskMgr
* Close Regedit.exe
3.
* Click Start, Run, type gpedit.msc and click OK.
* Navigate to this branch:
User Configuration / Administrative Templates / System / Ctrl+Alt+Delete Options / Remove Task Manager
* Double-click the Remove Task Manager option.
* Set the policy to Not Configured.
November 13, 2009
Login to Yahoo Messenger with multiple id in same time
I have good news for those who like chatting by using Yahoo! Messenger. We usually have more than one account (including Kang Rohman). In default, if we log in to Yahoo! Messenger on our computer, we cannot log in again with another account. If we try to log in with another account, automatically, the previously logged-in-account will be logged out, in other words, we can only log in with one account.
Is there a way to be able to log in with multi account within the same time? Well, actually there is the way to log in with multiple accounts in the same time. Want to know? Below are the steps (for Windows XP)
1. Click Start on your computer
2. Click Run…
3. Write : regedit
4. Click OK
5. When window registry editor open, find HKEY_CURRENT_USER
6. Open this: HKEY_CURRENT_USER ⇒ Software ⇒ Yahoo ⇒ Pager ⇒ Test.
7. Right click at the folder Test ⇒ New ⇒ DWORD Value
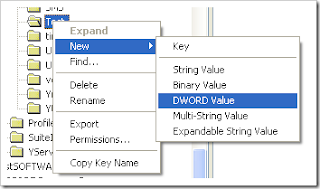 8. Rename the New Value #1 becomes : Plural
9. Right click at Plural ⇒ Modify
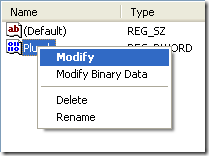 10.Change Value Data becomes 1, Base choose at decimal. Click OK
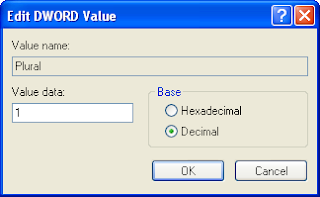
11.Close your Window Registry editor
Thats ok.You have done.
Is there a way to be able to log in with multi account within the same time? Well, actually there is the way to log in with multiple accounts in the same time. Want to know? Below are the steps (for Windows XP)
1. Click Start on your computer
2. Click Run…
3. Write : regedit
4. Click OK
5. When window registry editor open, find HKEY_CURRENT_USER
6. Open this: HKEY_CURRENT_USER ⇒ Software ⇒ Yahoo ⇒ Pager ⇒ Test.
7. Right click at the folder Test ⇒ New ⇒ DWORD Value
 8. Rename the New Value #1 becomes : Plural
9. Right click at Plural ⇒ Modify
 10.Change Value Data becomes 1, Base choose at decimal. Click OK
11.Close your Window Registry editor
Thats ok.You have done.
November 10, 2009
Disable Error Reporting From Your PC
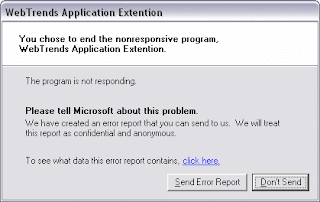
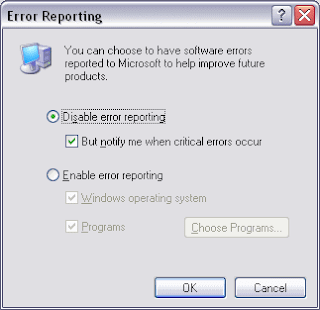 Whenever an application suffers from an error, and is closed down by the system or by you, the Microsoft Error Reporting feature will pop up, asking you if you want to send a report about the problem to Microsoft.
As I have reported previously, there are some privacy concerns with this.
Windows allows you to customize the way Error Reporting works. Open the System applet from Control Panel, and select the Advanced tab. Near the bottom, click the Error Reporting button.
You can enable or disable Error Reporting, or when you leave it enabled, you can specify which programs you want to exclude from this feature.
Customize Error Reporting
As I have reported previously, there are some privacy concerns with this.
Windows allows you to customize the way Error Reporting works. Open the System applet from Control Panel, and select the Advanced tab. Near the bottom, click the Error Reporting button.
You can enable or disable Error Reporting, or when you leave it enabled, you can specify which programs you want to exclude from this feature.
Display Administrator Account on Welcome Screen at Start Time
By default, the Administrator account is not displayed on the Welcome Screen. To log in to the Administrator account, press Ctrl+Alt+Del, release the Del key, and press it again, while still holding down the Ctrl+Alt keys. This will change the Welcome Screen login to the Windows 2000 style log in, where you can now type Administrator and the password for the Admin account.
You could also add the Administrator to the Welcome Screen:
1. Start the Registry Editor
2. Go to HKEY_LOCAL_MACHINE \ SOFTWARE \ Microsoft \ Windows NT \ CurrentVersion \ Winlogon \ SpecialAccounts \ UserList \
3. Right-click an empty space in the right pane and select New > DWORD Value
4. Name the new value Administrator
5. Double-click this new value, and enter 1 as it's Value data
6. Close the registry editor .
Hide Users on the Welcome Screen From Your PC
When you add an account for certain users with Windows XP, their user names will appear on the Welcome Screen. Sometimes a user needs to be added to a Windows XP machine, because the user needs access (via the network) to resources on the machine, but the user will not be physically logging in on the computer. You can remove this user name from the Welcome Screen, while still maintaining the user account.
1. Start the Registry Editor
2. Go to HKEY_LOCAL_MACHINE \ SOFTWARE \ Microsoft \ Windows NT \ CurrentVersion \ Winlogon \ SpecialAccounts \ UserList \
3. Right-click an empty space in the right pane and select New > DWORD Value
4. Name the new value exactly as the Username
5. Leave the Value data as 0
6. If you want to enable this user again on the Welcome Screen, either double-click the Username value, and change the Value data to 1, or delete the Username
7. Close the registry editor
Use the Hibernate Option
The hibernate feature saves everything in memory on your hard disk, turns off your monitor and hard disk, and then turns off your computer. When you restart your computer, your desktop is restored exactly as you left it.
Typically, you put your computer in hibernation when you will be away from the computer for an extended time or overnight. When you restart the computer, your desktop is restored exactly as you left it.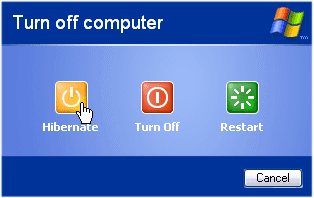
To put your system in hibernate, press Turn Off Computer on the Start menu, and on the next window, put your cursor over the Stand By button. Now press the Shift key on your keyboard. Stand By will change to Hibernate.
To use Windows Power Options, you must have a computer that is set up by the manufacturer to support these features. For more information, see the documentation that came with your computer.
What you need to know is that if hibernate is enabled on your computer, a hidden file hiberfill.sys is created in the root of your system drive (usually C:\), which is around the same size as your system's memory (RAM). You can't move this file to another drive, it has to be in the root of your system drive. If you don't use hibernate, you can remove this file by going to the Power Options in Control Panel, and on the Hibernate tab un-check Enable hibernation
Typically, you put your computer in hibernation when you will be away from the computer for an extended time or overnight. When you restart the computer, your desktop is restored exactly as you left it.

To put your system in hibernate, press Turn Off Computer on the Start menu, and on the next window, put your cursor over the Stand By button. Now press the Shift key on your keyboard. Stand By will change to Hibernate.
To use Windows Power Options, you must have a computer that is set up by the manufacturer to support these features. For more information, see the documentation that came with your computer.
What you need to know is that if hibernate is enabled on your computer, a hidden file hiberfill.sys is created in the root of your system drive (usually C:\), which is around the same size as your system's memory (RAM). You can't move this file to another drive, it has to be in the root of your system drive. If you don't use hibernate, you can remove this file by going to the Power Options in Control Panel, and on the Hibernate tab un-check Enable hibernation
Create a Password Recovery Disk in Your PC
If you want some added safety in case you forget your password, you should create a Password Recovery Disk. To do so, open User Accounts from the Control Panel. Select the account for which you want to create a Password Recovery Disk; this will put you in the change 'mode'. From the Related Tasks at the left side, choose Prevent a forgotten password and follow the wizard to create a Password Recovery Disk.
If you upgraded from Windows NT or 2000, you will need to create new disks. The old disks you created on the previous OS version won't work.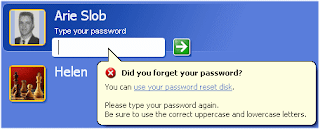
When you ever forget your password, you can press the and you will see a link to use your Password Recovery Disk. This will verify your access rights, and prompt you to create a new password, which you can use to access your account. The new password is written to your recovery disk at the same time you create it.
If you upgraded from Windows NT or 2000, you will need to create new disks. The old disks you created on the previous OS version won't work.

When you ever forget your password, you can press the and you will see a link to use your Password Recovery Disk. This will verify your access rights, and prompt you to create a new password, which you can use to access your account. The new password is written to your recovery disk at the same time you create it.
Remove Shared Documents Folder from Your Computer
If your computer is part of a Workgroup, you will notice that a Shared Documents folder appears in My Computer. This folder lets you share files with multiple users easily. If you want to remove this folder you can:
1. Start the Registry Editor
2. Go to HKEY_CURRENT_USER \ Software \ Microsoft \ Windows \ CurrentVersion \ Policies \ Explorer \
3. Right-click an empty space in the right pane and select New > DWORD Value
4. Name the new value NoSharedDocuments
5. Double-click this new value, and enter 1 as its Value data
6. Close the registry editor
7. Log off, or restart Windows for the changes to take effect
To reverse this process, change the Value data to 0, or delete the NoSharedDocuments Value.
Adjust the Size Of Thumbnails to your PC
There's an easy way to change the size of the thumbnails that are used in Windows Explorer's thumbnail view:
1. Start the Registry Editor
2. Go to HKEY_CURRENT_USER \ Software \ Microsoft \ Windows \ CurrentVersion \ Explorer \
3. Right-click an empty space in the right pane and select New > DWORD
4. Name the new value ThumbnailSize
5. Double-click this new value, and enter a value between 32 and 96 (hexadecimal)*
6. Close the registry editor
*) There have been information that the value can go up to 256 (hexadecimal), but I have not been able to set this value over 96 on my system. Frankly I doubt if higher values are indeed possible: 96 hex is already 150 (pixels) decimal. A thumbnail of 256 hex would be 598 pixels wide!
To return to the default, just delete the ThumbnailSize value.
The registry hack above will change the settings for the current user only. To change them for all users, add the key to HKEY_LOCAL_MACHINE \ Software \ Microsoft \ Windows \ CurrentVersion \ Explorer \ (you'll need administrative privileges to do this).
Prevent Your PC to Writing to USB Storage Devices
Many system administrators have had some sleepless nights over this: it is too easy for users to connect a device (USB-key or MP3 player) to the USB port of a computer, and copy things off the system. This is an obvious security risk. This has been addressed in Service Pack 2 for Windows XP. You have to manually add the following registry key:
1. Start the Registry Editor
2. Go to the HKEY_LOCAL_MACHINE \ SYSTEM \ CurrentControlSet \ Control key
3. If there is no key called StorageDevicePolicies, create it. You do this by right-clicking the HKEY_LOCAL_MACHINE \ SYSTEM \ CurrentControlSet \ Control key, and selecting New > Key from the menu.
4. Select the StorageDevicePolicies key
5. From the menu select Edit > New > DWORD Value
6. Name the new value WriteProtect
7. Right-click the WriteProtect value and choose Modify
8. In the Value Data: box enter 1
9. Exit the registry editor, and restart your computer
To reverse, just delete the new WriteProtect value (or set the value to 0) and restart the computer.
Note: works on Windows XP Service Pack 2 only!
Prevent Your Windows Media Player from Keeping a Recent-files List
 Windows Media Player's (WMP) file menu shows a list with the most recetly played files. To prevent WMP 8.0 (and later) from maintaining this list:
1. Start the Registry Editor
2. Select the HKEY_CURRENT_USER \ Software \ Microsoft \ MediaPlayer \ Preferences key
3. From the menu select Edit > New > Binary Value
4. Name the new value AddToMRU
5. Right-click the AddToMRU value and choose Modify
6. In the Value Data: box enter 00
7. Exit the registry editor
To reverse, just delete the new AddToMRU value (or set the value to 01).
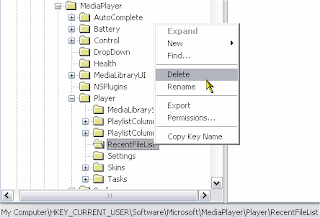
Note: To clear current entries from the most recently played files list, delete the registry subkey HKEY_CURRENT_USER \ Software \ Microsoft \ MediaPlayer \ Player \ RecentFileList (see picture below)
To clear streamed media entries, delete the registry subkey HKEY_CURRENT_USER \ Software \ Microsoft \ MediaPlayer \ Player \ RecentURLList
Try To Keep RAS Connections Alive When Switching Users
You might have noticed that when you use the "Switch User" feature of Windows XP, you will lose your RAS (Dial-up and/or certain xDSL connections) connection. You can avoid this by entering the following to your registry:
1. Start the Registry Editor
2. Go to HKEY_LOCAL_MACHINE \ SOFTWARE \ Microsoft \ Windows NT \ CurrentVersion \ Winlogon
3. Right-click an empty space in the right-hand pane, and from the menu select New > String value
4. Name the new value KeepRASConnections
5. Right-click the KeepRASConnections value, and choose Modify from the menu
6. Enter 1 as the Value data
7. Close the registry editor and log off from Windows for the changes to take effect
Next time you switch user (Start > Log Off > Switch User), you won't lose your connection!
Add "Copy to Folder" and "Move to Folder" to Explorer Context Menu For Better Use
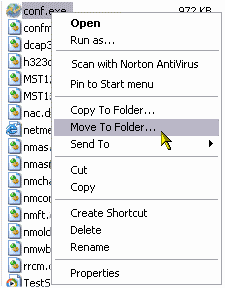 You can add "Copy to Folder" and "Move to Folder" to the Explorer context menu, so when you right-click a file or folder in Explorer, you have the option to Copy or Move it to another folder.
 - Start the Registry Editor
- Go to HKEY_CLASSES_ROOT \ AllFilesystemObjects \ shellex \ ContextMenuHandlers \
- Right-click the ContextMenuHandlers entry, and from the menu select New > Key
- Name the new key Copy To
- Repeat step 3, but this time for the name (step 4) choose Move To
- Change the (Default) string value found in the Copy To key to {C2FBB630-2971-11D1-A18C-00C04FD75D13}
- Change the (Default) string value found in the Move To key to {C2FBB631-2971-11D1-A18C-00C04FD75D13}
- Close the registry editor
About Us
There are lots of PC problem we face daily when we open and use our PC.This difficult for a new user to handle it.So he need to face a expert.By this blog site we will are looking for the those PC problem that we are facing and trying to give a solution.
Being responsive to your needs is our number one priority. We are constantly looking for ways to improve our equipment and services, to maximize our efficiency, offer you more and better marketing tools, and make each project easier for you to manage.
Being responsive to your needs is our number one priority. We are constantly looking for ways to improve our equipment and services, to maximize our efficiency, offer you more and better marketing tools, and make each project easier for you to manage.

